
If you've authenticated your Salesforce to ClientSuccess, worked with Support to set your Import Filter, and reviewed both the Integrations and Field Mappings pages, you're ready to begin actually setting up your field level mappings between ClientSuccess and Salesforce!
This article covers important details around what to understand when setting up your mappings. For a breakdown on how to configure a new field, see our Field Mappings Configuration page.
Because this article will address the integration on a more technical level, you may want to consider also reviewing the Sync Process Overview article as you're setting up your mappings.
This article is broken down in the following sections:
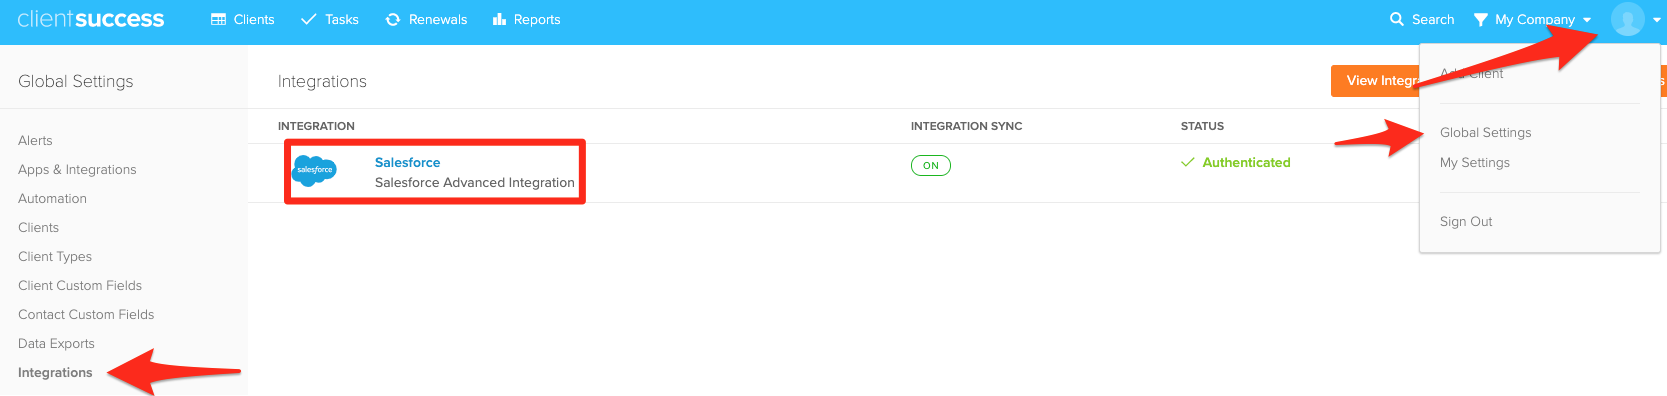
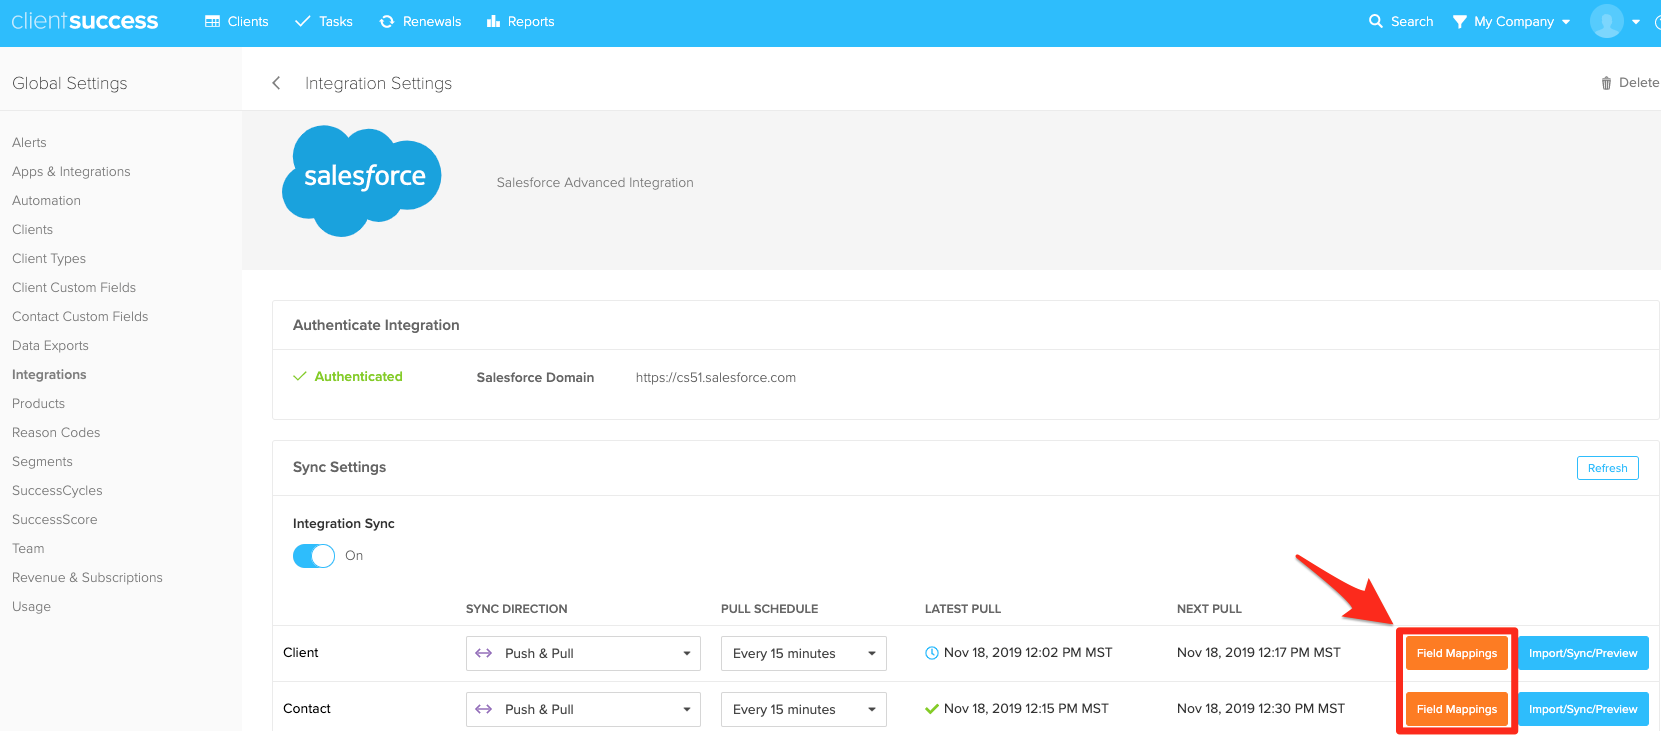
To get to your Field Mappings page, follow the screenshots below:
Mapping Types
Unique Identifiers (UIDs)
What is a UID?
A UID is the combination of letters/numbers assigned to a specific record, that links your Salesforce records (Accounts, Contacts etc.) to your ClientSuccess records (Clients, Contacts etc.). For more details on what UIDs are, see our "Unique Identifiers" article.
Your UID mapping is one of two required mappings in order for the the Client object sync to function, and it will be the first field you'll want to map.
Configuring your UID
When setting up their Salesforce integration, most customers will simply leverage the native record ID (Account, Contact etc.) as their UID. However, if you have an alternative ID, such as an ID that comes directly from your own product that you would prefer to use, and that ID is stored in your Salesforce, that is an option as well.
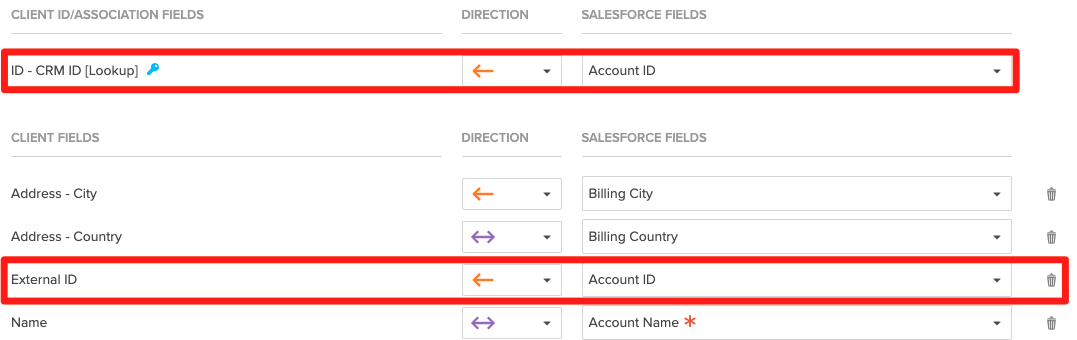
For your Client object mappings, a typical UID setup would look like the below. On the ClientSuccess side, the "ID - CRM ID [Lookup]" is a required mapping. Pair that up with whichever field in your Salesforce you want to use as your UID:

Above is the Client mapping you'll use should you choose to use the Salesforce Account ID (standard) as your Client/Account level UID. If you wanted to use some other UID from your Salesforce, simply select that field from the dropdown on the right under "SALESFORCE FIELDS".
Additional Info
For more information on UIDs, including using multiple UIDs, unique IDs vs. traditional mappings, and more, please see our Unique Identifiers article.
Association Mappings
What is an Association Mapping?
Unique identifiers (UIDs) allow integrations to take a UID, such as an Account ID, and find the specific record that the UID belongs to. As part of this process, you not only find which record the UID belongs to, but you can also return other data points that are associated with that record. Association mappings take advantage of the relationship between data points, taking one and using it to find others.
This section will explain how to configure Association Mappings. For a deeper explanation around what Association Mappings are, and how they should be leveraged, see this article.
Using Association Mappings
There are three specific instances where you may end up needing to leverage this functionality:
Assigned Sales Rep
Most Common (Lookup) Configuration
Though you're welcome to map your ClientSuccess Assigned Sales Rep field to whichever field you'd like, most commonly customers map it to the Salesforce "Account Owner" field, which is the default setup for Salesforce:
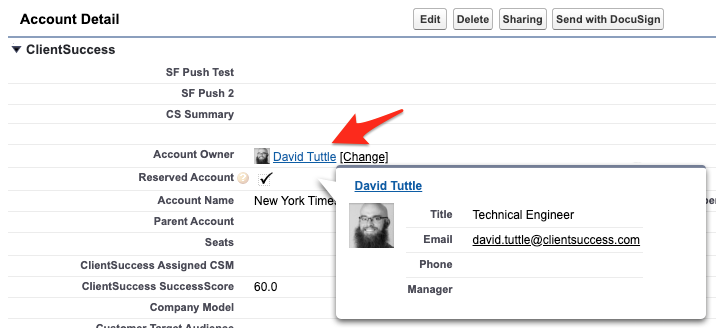
Although you see a full name being displayed in this field, the actual data or value stored in this field is the Salesforce User ID for whoever is listed here. In the case above, "David Tuttle" is what you see in the UI, but the actual value stored is "0054B000001capL":
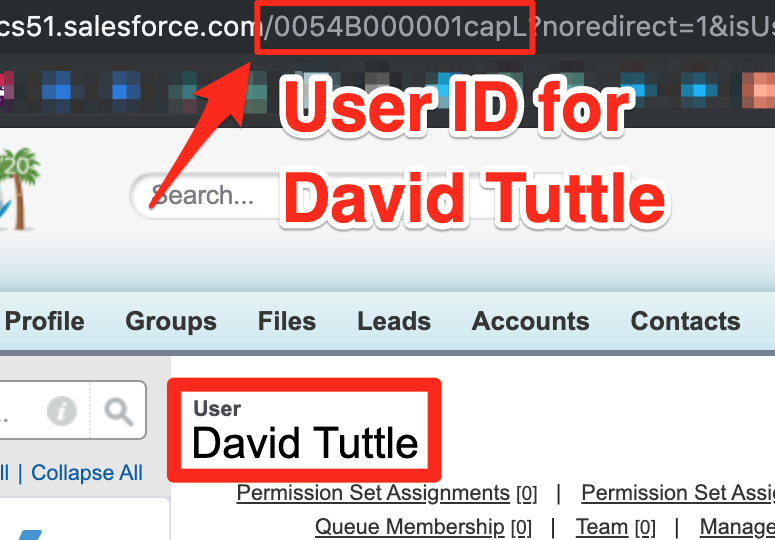
What this means for you is, were we to setup your Assigned Sales Rep in ClientSuccess to map to your Account Owner field, when we pull in data from Salesforce, we're going to receive the User ID (0054B000001capL) from Salesforce, and not the string name ("David Tuttle").
This is something the integration is designed to handle, though one extra configuration is needed accommodate. See this article for a how-to on adding your Sales Reps as Users.
To properly handle this mapping, you'll want to configure it as below:

Breaking down this mapping's logic:
- The left side indicates the type of data that ClientSuccess is expecting to receive:
- Which ClientSuccess field we're working with: Assigned Sales Rep
- The type of data we'll receive: CRM (Salesforce) ID > for your Sales Rep (User ID)
- What ClientSuccess should do with this data: "Lookup" the associated ClientSuccess User
- On the right side, the Salesforce field name as the API describes it
- Owner ID
Should you be using a Lookup field in Salesforce that stores a different type of data, which it will pass to ClientSuccess, there are a variety of different lookup options in ClientSuccess you can leverage:
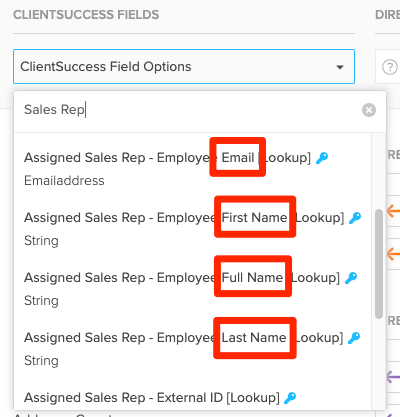
Mapping to a Non-Lookup Salesforce Field
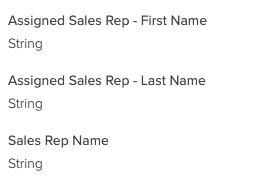
Alternatively, if you're mapping to a more standard field (non-lookup) in your Salesforce, that simply houses a Sales Rep's First Name, Last Name, or Full Name, and you want to simply pull that value across and display it, use one of the mappings below:
Assigned CSM
About the Assigned CSM Field
The ClientSuccess Assigned CSM field is what we refer to as a "Restricted Picklist". This field won't simply accept any and every value it's given. The values that will be accepted by this field must be managed in a specific way. In this case, leveraging the Global Settings > Team page:
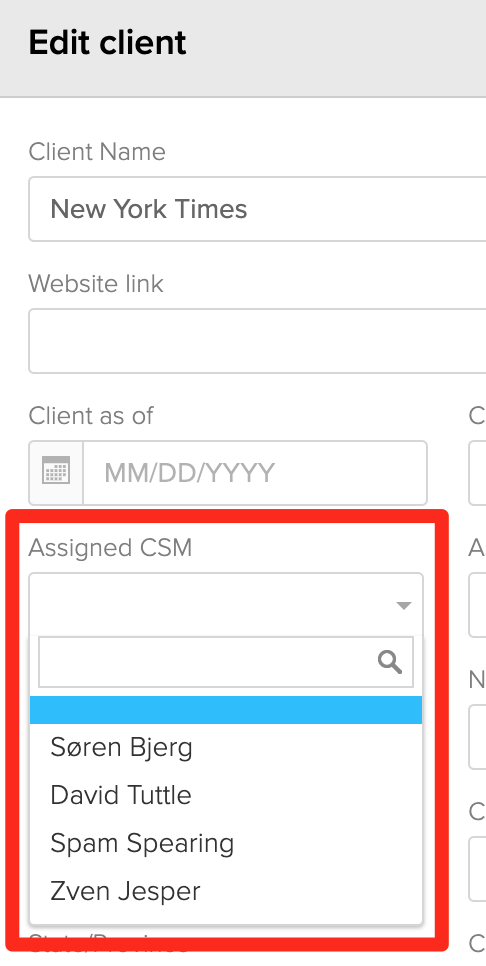
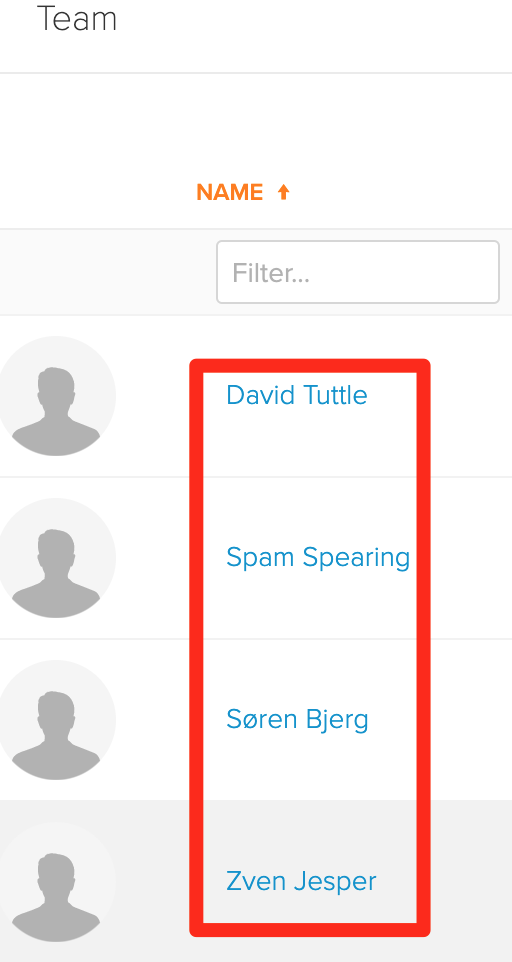
As you can see from the side-by-side screenshots above, the only options available in the "Edit Client" page for the Assigned CSM field, are active Users that exist in the Team page. This means that, should you attempt to pass a value from Salesforce to ClientSuccess for your Assigned CSM, and that value does not match up in some way with one of your Active Users, the sync will fail for that field.
So long as you've added all of your CSMs as Users in your Team page, there are a few different values that you can pass through to ClientSuccess that will be accepted, and know who should be set as the Assigned CSM
Importing Assigned CSM Values
- Similar to the Assigned Sales Rep, you may find that the field in Salesforce which contains your Assigned CSM data is a Lookup Field containing a Salesforce User ID as opposed to a string text name (see Assigned Sales Rep info just above this for details). Please reference the same article for details on accommodating this setup.

- Alternatively, there are a handful of other values that the integration can receive > And then use to go and find the ClientSuccess User that is associated with that value.
- Similarly to the Assigned Sales Rep setup, choose whichever field represents the data type that you'll be passing to ClientSuccess from your Salesforce field (email, full name etc., full name being the most common):

Pushing Assigned CSM Back to Salesforce/Bi-directional Mapping
Because the inbound path for the Assigned CSM field requires us to perform a "lookup" to find which ClientSuccess User should be set as the CSM, configuring the Assigned CSM field to push updates back to Salesforce is a bit unique.
The directions above explain how to handle the Salesforce > ClientSuccess data flow for this field. In order to push the Assigned CSM back to Salesforce, a separate mapping is required.
Note: For those looking for a one-way push of the Assigned CSM field, from ClientSuccess to Salesforce, only this one mapping is needed.
The integration is able to push any of the following Assigned CSM values back to Salesforce:
- Assigned CSM - CRM ID
- First Name
- Last Name
- Full Name
For the Assigned CSM mappings, you can identify inbound vs. outbound mappings based on whether they have "[Lookup]" at the end of the mapping's label. A lookup field indicates an inbound-only mapping:

Note: The field "Assigned Sales Rep" follows the same pattern as Assigned CSM.
Additional Info
- Each ClientSuccess field can only be used in a single mapping.
- However, you can map the same Salesforce field to multiple ClientSuccess fields. For example, in addition to the default "ID - CRM ID [Lookup] <- Account ID" mapping, you could also setup a mapping that would bring your Account ID into a different ClientSuccess field, such as your "External ID" field:
Comments
7 comments
Reorder Client Custom Fields, simply drag and drop them in the desired order within the settings, helping streamline processes like tims price
Reorder Client Custom Fields, simply drag and drop them in the desired order within the settings, helping streamline processes like roblox.
Beanie hats Reorder Client Custom Fields, simply drag and drop them in the desired order within the settings, helping streamline processes like
Reorder Client Custom Fields, simply drag and drop them in the desired order within the settings, helping streamline processes like nulls brawl pc.
Locksmith Barnsley Reorder Client Custom Fields, simply drag and drop them in the desired order within the settings, helping streamline processes like
European store Reorder Client Custom Fields, simply drag and drop them in the desired order within the settings, helping streamline processes like
Reorder Client Custom Fields, simply drag and drop them in the desired order within the settings, helping streamline processes like Blox Fruits Codes
Please sign in to leave a comment.